April 17, 2013

Nutella Swiss Buttercream

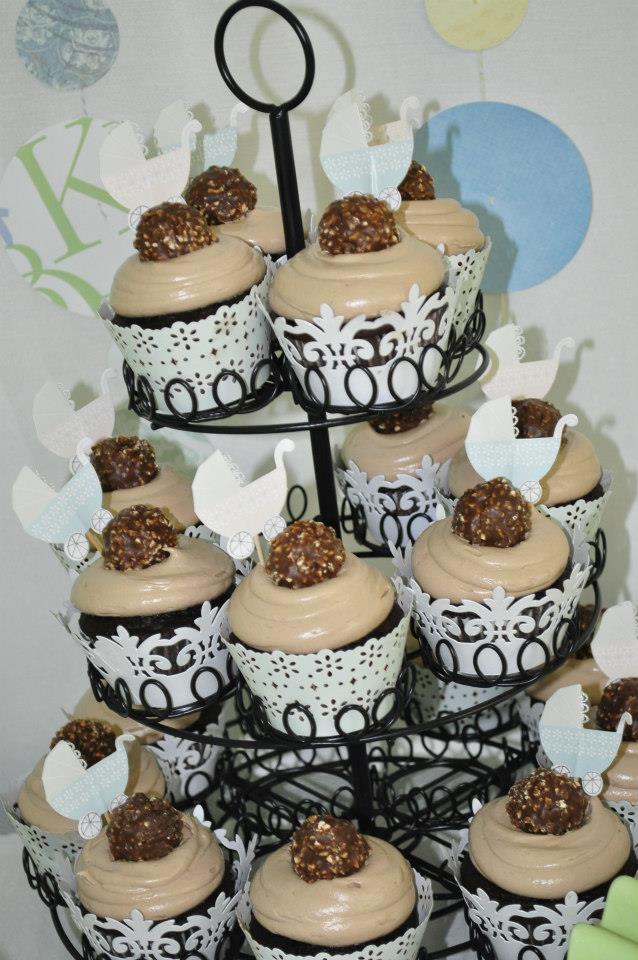
I've developed a slight distaste for American buttercream because it is so sweet and the flavor is so-so. For Sarah's baby shower, I was searching for a Nutella buttercream for the Ferrero Rocher cupcakes and I came upon Nutella Swiss buttercream. I've never made any kind of Swiss buttercream up until that point so I was unsure of how it would turn out but I had beginner's luck on my side and the buttercream came out wonderfully well. I was so pleased. It wasn't too sweet but you could taste the Nutella. Plus, it was fluffy and creamy. What more could you ask for?

If you're wondering about the cupcake itself, I cheated. I used a box mix because I've never been truly satisfied with my from-scratch chocolate cupcakes. It saved me some time which is a good thing.


Nutella Buttercream Frosting:

•5 large egg whites
•1 1/2 cup sugar
•4 sticks unsalted butter, diced and softened
•1/2 cup of Nutella

DIRECTIONS:
1. Put egg whites and sugar into the top of a double boiler over a pan of simmering water. Whisking constantly, cook until sugar has dissolved and mixture is warm (about 160 degrees)

2. Pour heated egg whites into the bowl of an electric mixer fitted with the whisk attachment. Beat egg white mixture on high speed until it forms stiff (but not dry) peaks. Continue beating until fluffy and cooled, about 7 minutes total.

3. Switch to the paddle attachment. With mixer on medium-low, add butter two tablespoons at a time, beating well after each addition. Increase speed to medium-high; continue beating until frosting appears thick, about 3 minutes.

4. Reduce speed to low; add Nutella a few tablespoons at a time and continue beating until incorporated.

Easy enough. Look up Swiss buttercream or French buttercream. I think they have a lot more flavor without being so sweet. Let me know how your experiments go!

April 11, 2013

Baby Shower

Like I said on my previous post, I haven't done a ton of baking in the past year and half, but I did one big event: my sister-in-law's baby shower. My family assembles at my parent's house for Christmas and this year my mom and I planned to throw a surprise baby shower for my sister-in-law, Sarah. My brother and Sarah flew in on Saturday afternoon and as soon as they stepped into our newly re-finished basement, we yelled 'SURPRISE!'. It was a shock for Sarah but she was really happy. As one of the hostesses, I couldn't have been more pleased with how everything turned out. We did a French Country/Afternoon Tea Party theme. All of the food was French-ish. I made most of the food myself including French macarons and Nutella cupcakes. We also had baked brie, crudites in French bread, mini-quiches, madeline cookies, and meringues.


The decorations were handmade by my other sister-in-law, Jenny, and myself. We used tons of scrapbook paper and a circle-cutter (if you don't have one, I would suggest investing in one. It makes life so easy.). We created lanterns, place settings, a back-drop for the food table, a banner made out of doilies that said 'Bienvenue Bebe', and circle confetti for the table. We used all of my mom's tea cups and her tea kettles served as vases for flowers. The decorations looked fabulous. Feminine and dainty and nothing screamed "BABY!".


As we all know that baby shower activities and games have been over-done and they can get kind of annoying after a while. I decided to jump on the trend of making baby onesies. I bought onesies of different sizes and a few decorations but I gave instructions to the ladies to bring some of their own like iron-ons, buttons, and other things. We set up the corner with a table and ironing board with an iron. I think everyone had fun making a personal onesie for the baby.


All in all, it was a fabulous party enjoyed by all. In my coming posts I will share the recipes that I used in the shower.

Picture credit: All pictures were taken by my sister-in-law, Jenny.

April 9, 2013

It's been a while

Hello all! It's been a loooong time since I've posted anything on my blog. A lot has happened in the last year and a half. I got rejected and then accepted into nursing school. I moved to Connecticut. I started nursing school and I completed it in about 12 months. I took my nursing board exam (NCLEX) and passed and now I'm looking for a job. It's been a roller coaster of a ride but God has been good to me and has blessed me more than I deserve. Now, I'm back and it's time I start posting regularly again. I haven't done a ton of baking in my one and half year hiatus but I did my sister-in-law's baby shower so I'll be posting pictures of that soon.

August 13, 2011

Bridal Shower

I'm sorry, my friends, for keeping such a large gap between posts. Life has a way of getting away from you. The past four weeks have been a complete blur. In July, I received a request to make cupcakes for a Bridal Shower which was to take place in the end of July. I also was invited to participate in a photoshoot for a local make-up artist. Two events in one weekend? That, too, during my birthday? Yes, it happened. The bridal shower was pretty straight forward. Vanilla cupcakes with yellow fondant and some with light orange buttercream. I was smart to get the baking done on Thursday night and left the decorations for Friday. I didn't finish the decorations until 4am, but it was well worth it. I hand-made cupcake wrappers and that's what took the most time. Take a look at the finished products:

You, too, can make your own cupcake wrappers. It's really easy. Use the following template: http://www.southernladymagazine.com/web_extras.asp
Use scrapbooking paper (without glitter or anything that could contaminate your cupcake) and use some decorative scissors to give your wrappers a professional look. I was able to make six wrappers from one 12x12 paper. To break it down for you: I made each wrapper for about $0.07 as opposed to store bought wrappers which are about $1.00 each. That's a pretty good deal. You can always make your wrappers ahead of time and store them in a zip-lock bag. I used photo splits to connect the ends of the wrapper because I'm not a fan of tape showing. If this is a project you want to take on then I should warn you: try to stay away from heavier paper, like cardstock. Cardstock has a hard time staying "stuck" once the photo splits are attached.

Enjoy your cupcake wrapper adventure!


June 25, 2011

June Creative Connection

I was asked to be a part of the JUNE Creative Connection LA Breakfast on June 18. I was all ready to go with my cupcake plans and then I got really sick. I still wanted to make the cupcakes and managed to do so but I wasn't able to attend. I wanted to share some pictures that were taken at the event. The pictures are courtesy of Brienne Michelle: Photography for Life. Her website is briennemichelle.com, her blog is briennesblog.com and her number is 661.803.5811. Check her out, she's really talented and takes truly exquisite photograghs.

June 10, 2011

Bread Pudding

It's been a long time since I've blogged because a lot has happened. I was in Connecticut for a full month because my dad had surgery. I haven't gotten a lot of baking done but I did get to make a couple of things while I was home.

We bought a speciality bread from Costco, it was fruit and nut bread. It was pretty good. Since it was really humid in CT, we put it in the fridge. Who knew that bread gets stale the fastest at that temperature? Needless to say, we had a very, very hard loaf of bread on our hands. My mom asked me to make bread pudding. I made bread pudding on Easter and wasn't too happy with the results. But I thought I would give it another chance. This time I turned to my trusted food guru--Alton Brown. I watched his Good Eat's episode "The Truth is in the Bread Pudding" (I highly recommend watching this if you want to know how to make good bread pudding) and went off of his Spiced Bread pudding.

Spiced Bread Pudding
Recipe courtesy of Alton Brown, 2011

Ingredients
1 cinnamon stick
1 teaspoon freshly grated nutmeg
1 teaspoon dried orange peel
15 whole cloves
15 whole peppercorns
1/2 ounce crystallized ginger, chopped
5 cups half-and-half, divided
3 large whole eggs
3 large egg yolks
1/2 cup granulated sugar
1/2 cup dark brown sugar
2 ounces spiced rum
1 (10-inch) stale French boule
1/2 cup golden raisins
1/2 cup dried cherries
1 to 2 tablespoons unsalted butter, melted and cooled slightly

Directions
Place the cinnamon, nutmeg, dried orange peel, cloves, peppercorns, and ginger into 3 cups of half-and-half in a microwavable container and microwave on high for 3 minutes. Check the temperature of the mixture and microwave in 30 second increments until it reaches 180 degrees F. Cover and steep 15 minutes.

Place the eggs and yolks in a blender with an 8-cup carafe. Blend on the lowest speed for 30 seconds. Raise the speed to quarter power and slowly add the sugars and blend until thickened slightly, about 1 minute. Add the remaining 2 cups half-and-half. With the machine still running, pour in the spiced half-and-half through a small hand strainer and add the rum. Use immediately, or store covered in the refrigerator for up to 72 hours.

Preheat the oven on the lowest (or warm) setting.

Cut a 7-inch round disk off the top of the boule using a long bread knife or serrated slicer. Tear the disk into pieces and scatter in a large roasting pan. Cut all the way around the inside of the boule just inside the outer wall. Cut downward and across the interior of the bread, first in one direction, then 90 degrees to it to create a grid, the way you would cube mango flesh to remove it from the skin. Remove the plugs of bread and tear into hunks about the size of an egg. Add to the roasting pan and bake until bread is dry, 1/2 to 2 hours.

Sprinkle the fruit over the bread, pour in the custard, and press the bread to submerge all the pieces. Cover and soak for 2 hours at room temperature or for up to 8 hours in the refrigerator.

Preheat the oven to 325 degrees F.

Pour the melted butter into a spray bottle and spritz the inside of the bread shell. Be sure to cover the bottom with a thin layer to prevent the custard from soaking through. Place the bread shell in a 10-inch cast-iron skillet and place in the oven to toast the interior for 30 minutes.

Remove the bread shell from the oven and transfer the soaked bread mixture into the shell. Bake until the bread pudding souffles and reaches an internal temperature of 165 to 170 degrees F, 1 1/2 to 2 hours. Remove and cool 30 minutes before slicing or scooping and serving.
*************************************************************

I had to read and re-read this recipe a couple of times. It is pretty complicated, that's why I watched the corresponding Good Eat's recipe. I used the basic principles of the recipe once I learned how to construct bread pudding.

First, I had to cut the crust off the bread. It was easier said than done. My arms got a serious workout.

Once the loaf was de-crusted, I buttered my dish, cubed the bread and arranged it evenly with some golden raisens.


Once that was done, it was time to make the custard. I followed the recipe pretty exactly except I used 2 eggs and 3 egg yolks. My parent's don't exactly own rum so I used rum extract and it worked out well. The custard smelled pretty amazing so I poured it over the bread and let it sit.


Then I baked it for an hour because the internal temperature of the bread pudding reached 170 degrees.


My only regret was that I added too much pudding. It ended up settling to the bottom in a small layer. Alton designed the recipe with a little extra pudding so you could add at your discretion. I started out with less bread than his recipe requires so I should have left out about 2 cups of half and half and I would have been ok.

Nevertheless, the bread pudding was AMAZING. I'm not a 'fruit & nut' person but this was so tasty. I loved it. I hope you try this recipe and I'm sure you'll enjoy it too!
April 2, 2011

Glam Shoot

Ever since I begin the idea of starting to develop my love of cupcakes into a business my friend, Rachel Ferkovich, expressed her desire to take photographs of my delicious creations. Well, that time has come. Despite her busy schedule of planning a wedding, work and her family life, she managed to take time to come by and take pictures.

I'm so excited to present the unique look of Kaitlyn's Kupcakes to the public.


This photoshoot reflects not only my personality but it shows what Kaitlyn's Kupcakes is all about--simple sophistication.

March 30, 2011

Gluten-Free Cupcakes

After my post about the gluten-free chocolate cake, I've had some questions about gluten-free cupcakes. The answer is yes, I can make them. They are called Poppy Seed Gluten-Free Cupcakes. These cupcakes have an apricot buttercream and are decorated with sliced almonds. Instead of wheat flour I will use potato starch flour. These cupcakes will be $3 a piece with a minimum order of 12.
Photo courtesy of http://www.justasoap.co.uk/catalog/apricot-kernel-oil-p-196.html

March 26, 2011

Flourless Chocolate Cake

The idea of making flourless chocolate cake always interested me. I'm not sure why. About a year ago I found a recipe that I absolutely fell in love with and I learned that you don't have to be gluten intolerant to enjoy this wonderful confection.


Cracked Chocolate Earth (Flourless Chocolate Cake)
Courtesy of Tyler Florence

1 pound bittersweet chocolate, chopped into small pieces
1 stick unsalted butter
9 eggs, separated
3/4 cup granulated sugar

Preheat the oven to 350 degrees F. Butter a 9-inch springform pan.

Put the chocolate and butter into the top of a double boiler (or in a heatproof bowl) and heat over (but not touching) about 1 inch of simmering water until melted. Meanwhile, whisk the egg yolks with the sugar in a mixing bowl until light yellow in color. Whisk a little of the chocolate mixture into the egg yolk mixture to temper the eggs - this will keep the eggs from scrambling from the heat of the chocolate; then whisk in the rest of the chocolate mixture.

Beat the egg whites in a mixing bowl until stiff peaks form and fold into the chocolate mixture. Pour into the prepared pan (spray the bottom with nonstick spray) and bake until the cake is set, the top starts to crack, and a toothpick inserted into the cake comes out with moist crumbs clinging to it, 20 to 25 minutes. Let stand 10 minutes, then unmold.


This recipe is really simple. Just keep in mind that it's all about the eggs. If you mess that up then you're going to end up with chocolatey scrambled eggs. If you've never tempered eggs before then my advice is to go slowly. Don't add more than 1/3 cup of chocolate at a time. Once you've tempered eggs once or twice and have gained confidence then you can add a little more chocolate at a time. Just be careful.

The body of the cake comes from the egg whites. When I've made this cake for people they find it hard to believe it doesn't have any flour because it's so fluffy. Well friends, it's all in the wrist. Folding eggs can be a little tricky, but again it takes a little practice. Once you've beaten the eggs until they form stiff peaks, add about 1/3 to the chocolate. Using only a rubber spatula cut through the mixture and roll your wrist in a clockwise direction (if you are right-handed), folding the chocolate and egg whites together. Keep going and turn the bowl a quarter of a turn every time you fold. Fold only until the chocolate and egg whites are barely mixed and then add another third. Never, ever use a whisk to mix the chocolate and egg whites together and never use the spatula to mix rigorously. If you have trouble picturing what folding is, then be sure to check out some videos on YouTube. You could even go to the Food Network website and find a video there.

A quick note about the pan. You want to use a good spring-form pan that doesn't leak. I got mine from Wal-mart and it had a viking on it so I bought it and it's great. For this cake, instead of spraying it with anything (you should know by now that I don't like using the spray stuff) I grease the pan using butter and a paper towel. Once I spread a thin layer of butter all over, I use granulated sugar to coat the inside of the pan. To do this, just throw some sugar inside, shake it all about, and then discard any leftover sugar. Once the cake is baked you'll get a nice crunchy outside.

If you use a toothpick to check for doneness please be warned: the center of the cake should be a little raw. If you stick a toothpick in the center then the batter should stick to it. If you stick the toothpick about an inch to two inches away from the center, then you should have crumbs sticking to it. Once, I made the cake and made sure the toothpick came out clean but the cake ended up super dry. If you bake the cake to the point where it's still a little sticky in the middle then once it cools you will have a perfectly baked cake. If you're worried it's too raw then don't panic; once the cake is cooled down to room temperature you can throw it in the fridge and you'll have a cake that has the texture of cheesecake. How awesome is that?

I have one last note on this recipe. Due to the fact that it only has four ingredients make sure to get high quality products. Your eggs should be really fresh. The butter should be quality, un-salted, sweet cream. The chocolate is the most important thing. I always use Ghirardelli bittersweet chocolate. It's a little expensive but definately worth it. If you can't find chocolate that specifically says "bittersweet" then look for something that has a 65% or higher cocoa content.

This cake is definately worth the effort. It's rich without being heavy. The bittersweet chocolate allows you to enjoy the taste of chocolate without the sweetness. Even my dad, who is not normally a fan of chocolate, likes this cake. My serving suggestion is to make it as close to serving time as possible. It's wonderful when it's warm with a dollop of whipped cream on top or high quality vanilla ice cream on the side.

Don't be intimidated by the need for intermediate skills. You can do it. Just take your time until you gain confidence.

March 21, 2011

Scones

Scones are a food that will either taste like bits of heaven or they will taste like bricks made from saw dust. There's really no middle ground. I have had scones that were wonderful and some that were barely edible even with the generous addition of butter and lemon curd. Ina Garten from the Food Network has a recipe that creates perfectly light scones that have the right amount of sweetness.

Cranberry Orange Scones
courtesy of Ina Garten

4 cups plus 1/4 cup all-purpose flour
1/4 cup sugar, plus additional for sprinkling
2 tablespoons baking powder
2 teaspoons kosher salt
1 tablespoon grated orange zest
3/4 pound cold unsalted butter, diced
4 extra-large eggs, lightly beaten
1 cup cold heavy cream
1 cup dried cranberries
1 egg beaten with 2 tablespoons water or milk, for egg wash
1/2 cup confectioners' sugar, plus 2 tablespoons
4 teaspoons freshly squeezed orange juice
Directions
Preheat the oven to 400 degrees F.

In the bowl of an electric mixer fitted with a paddle attachment, mix 4 cups of flour, 1/4 cup sugar, the baking powder, salt and orange zest. Add the cold butter and mix at the lowest speed until the butter is the size of peas. Combine the eggs and heavy cream and, with the mixer on low speed, slowly pour into the flour and butter mixture. Mix until just blended. The dough will look lumpy! Combine the dried cranberries and 1/4 cup of flour, add to the dough, and mix on low speed until blended.

Dump the dough onto a well-floured surface and knead it into a ball. Flour your hands and a rolling pin and roll the dough 3/4-inch thick. You should see small bits of butter in the dough. Keep moving the dough on the floured board so it doesn't stick. Flour a 3-inch round plain or fluted cutter and cut circles of dough. Place the scones on a baking pan lined with parchment paper. Collect the scraps neatly, roll them out, and cut more circles.

Brush the tops of the scones with egg wash, sprinkle with sugar, and bake for 20 to 25 minutes, until the tops are browned and the insides are fully baked. The scones will be firm to the touch. Allow the scones to cool for 15 minutes and then whisk together the confectioners' sugar and orange juice, and drizzle over the scones.


I don't normally make cranberry orange scones. It's a nice combination but it's not my favorite. If you want to make scones the way Ina does then by all means go right ahead. If you want to make scones the way I make scones then follow my recipe.

In a large bowl, sift together
4 cups of AP flour
1/4 cup of sugar
2 tbs baking powder
2 tsp kosher salt

In a separate, medium bowl mix together:
3/4 pound (3 sticks) of slightly cold butter that has been cut into pea-sized cubes with a butter knife
4 extra large eggs
1 cup of half-and-half (you could even use whole milk)

I use a hand mixer to blend the wet ingredients until half of the butter no longer resembles cubes (start with the milk and eggs first, mix, and then add the cubed butter). Don't beat this mixture too long, it's not meant to be homogenous.
I add the wet ingredients into the bowl with the dry ingredients. With my hand mixer on low I lightly beat the two elements. I blend only until the liquid is incorporated into the flour. I stop using the hand mixer and then dig in with my hands. If you don't want to get messy then you won't get nice scones. No pain, no gain my friend.
Using my fingers I pinch the larger clumps of butter until they are more or less blended. You won't be able to blend the butter completely into the dough and that's ok. Just learn from my mistake: when I leave too many large clumps of cold butter in the dough, then all of that butter will melt out of the scones and create pools of clarified goodness at the bottom of the baking sheet and leave you with slightly dry scones.
The dough will get sticky really fast and become kind of gummy. This is good. Do your best to blend all the ingredients together. The dough is supposed to be lumpy. Then, using your fingers, pick up small amounts of dough and drop them onto a baking sheet lined with parchment paper. Making scones in this 'drop' method helps keep the air inside. If you knead the dough and add that extra flour I feel like you lose the light texture. Try not to compact the dough in your hands before putting it on the sheet (granted, this will be hard because the dough is so sticky and thick). Just scoop with your fingers and drop onto the sheet and be sure to leave atleast 1.5 inches between each scone. Easy-peasy. Put them into the oven at 400 degrees for 15 minutes and then check on them. I found that in my oven the tops of the scones look light but the bottoms get really brown, so be sure to lift up the scones at the 15 minute point. If they look tannish to a light brown give the scones a couple more minutes. Once the scones look brown in some parts but still maintain a light brown color in other parts then they are done. Again, you have to eye ball it. It's that easy.

This past Christmas I made a lot of scones. When my family is together we drink tea atleast twice a day and scones with tea go together like peanut butter and jelly. What flavor of scones was everyone's favorite? Crystallized ginger and dark chocolate. If you made a face while you read the previous sentence then you need to repent. It's a fabulous combination! Crystallized ginger can be found in most grocery stores and it is candied ginger that has been coated in sugar. I chop it until the pieces are small but not too small. The degree to which you chop your ginger is a personal preference. We love ginger in our family so I'm never afraid to keep some pieces medium-sized. As for the chocolate, it's best to use atleast semi-sweet. The reason I use dark chocolate is because the bitterness from the chocolate pairs beautifully with the sweetness from the ginger. Some people don't like dark chocolate, so if you don't prefer it then don't use it. When you bake it's important to follow the recipe but I think it's more important to use common sense and do what your taste buds like.

Here are some other variations you can try:
-instead of white sugar use brown sugar and maple syrup. Mix in finely chopped pecans with cinnamon and nutmeg.
-add 1 cup of pumpkin puree with some pumpkin spice. (Although I've never personally done this you may have to reduce the amount of milk you add)
-white chocolate with finely chopped macadamia nuts
-dried cherries with semi-sweet chocolate
-ground cardamom with finely chopped pistachios
-dried blueberries with lemon zest
-chopped, candied peel
-raisens

You can even make savory scones to compliment a brunch, light lunch or dinner. Remember to remove the sugar.
-finely chopped leeks that have been sauteed in oil, chedder cheese, fresh chives and chopped ham
-grated, smoked hard cheese and parsley
-replace 1/2 cup milk with 1/2 cup sour cream and add chives
-sauteed onion, bacon and grated cheddar cheese
-blue cheese, freshly chopped spinach, parsley and green onion
-cheddar cheese and mustard powder
-Romano cheese and finely chopped walnuts

Scones are no longer "that dry stuff" British people eat with their high tea. Scones are simple to make and a versatile palette for your palette.

In January, I made four different types of scones for the ladies in my mother's Esther Fellowship group. They were greatly enjoyed by all.

My favorite Chocolate Chip Cookies

Before I got into cupcakes I loved making cookies and brownies (and I still do). I have to credit the start of my baking career to my brothers. They would go off to college and I would make goodies for them. My brownies were and continue to be from the box. Ghiradelli Triple Chocolate Brownies are hands-down the best brownies ever!! You can't go wrong, I promise. As far as cookies are concerned, my favorite recipe is from Giada De Laurentis from the Food Network. I started making this recipe many years ago and I love the results ever time.

Hazelnut Chocolate Chip Cookies
courtesy of Giada De Laurentis

1/2 cup old-fashioned oats
2 1/4 cups all-purpose flour
1 teaspoon baking powder
1 teaspoon baking soda
1/2 teaspoon salt
1 cup unsalted butter, room temperature
1 cup (packed) light brown sugar
1 cup sugar
2 large eggs
1 teaspoon pure vanilla extract
4 ounces English toffee candy (recommended: Heath or Skor bar), finely chopped
1 cup hazelnuts, toasted, husked, and chopped
1 (12-ounce) bag semisweet chocolate chips
Directions
Preheat the oven to 325 degrees F.


Line 2 heavy large baking sheets with parchment paper. Finely chop the oats in a food processor. Transfer the oats to a medium bowl. Mix in the flour, baking powder, baking soda, and salt. Set aside.

Using an electric mixer, beat the butter and sugars in a large bowl until fluffy. Beat in the eggs and vanilla. Add the flour mixture and stir just until blended. Stir in the toffee, hazelnuts, and chocolate chips.

For each cookie, drop 1 rounded tablespoonful of dough onto sheet, spacing 1-inch apart (do not flatten dough). Bake until the cookies are golden (cookies will flatten slightly), about 15 minutes. Cool the cookies on the baking sheets for 5 minutes. Transfer to a cooling rack and cool completely. (The cookies can be prepared 1 day ahead. Store airtight at room temperature.)


I've made my own changes to the recipe.
1. I don't put the oats through a food processer. I really like the texture of oats.
2. I add about 1/4-1/2 of a cup more of oats
3. I only put in 3/4 of a cup each of brown sugar and regular sugar
4. I never, ever melt my butter in the microwave. It changes the consistency of the creamed butter and sugar mixture.
5. I cream the butter and sugar until it is quite light in color
6. I always add more vanilla extract
7. I rarely use hazelnuts. I personally like using walnuts better because I think it tastes better plus, it's cheaper.
8. I don't put an entire bag of chocolate chips in the the batter, I usually eye-ball it. Most times I use about 3/4 of the bag.
9. Lastly, I don't line the baking sheets with parchment paper. I usually shmear butter on the baking sheets and wipe them down before I scoop more batter onto them. This is more messy and time-consuming but I like the way they turn out.

I hope you enjoy your delicious cookies!!

March 19, 2011

Adventures with Fondant

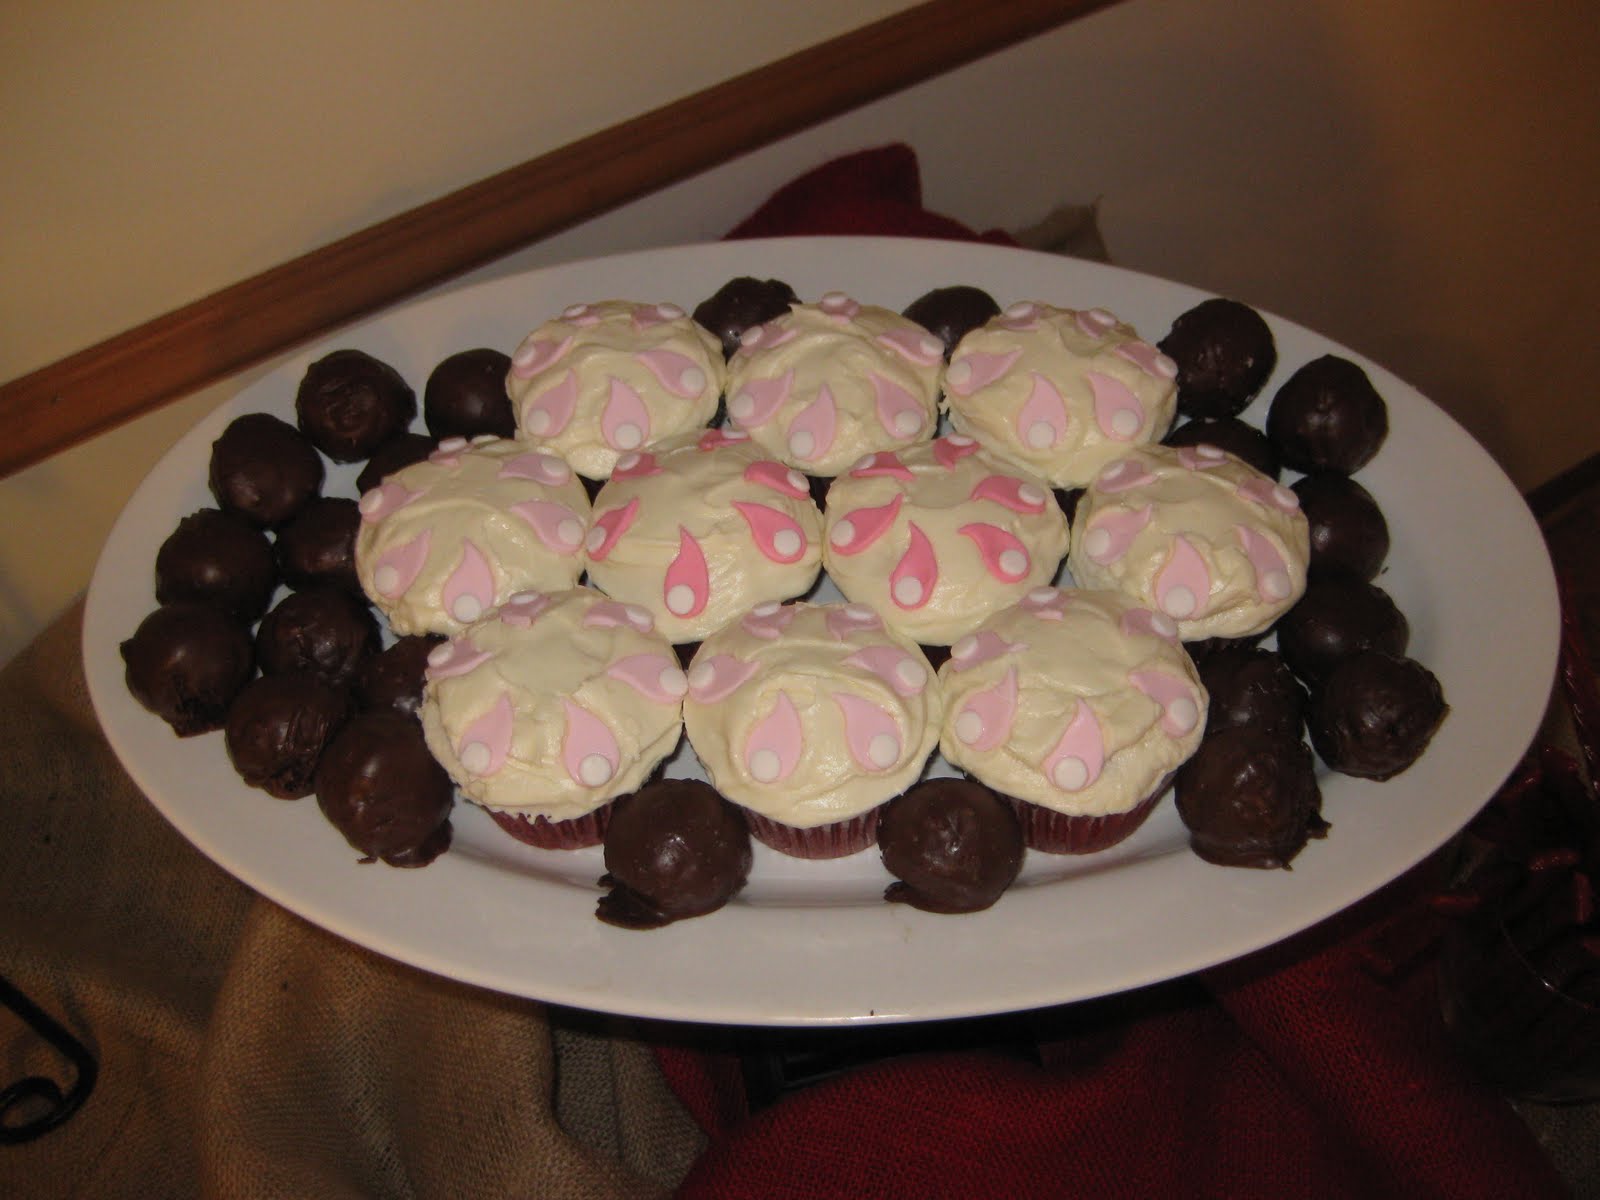
I wanted to make Red Velvet cupcakes for Jesse and Deidre Johnson's open house. Instead of doing my normal star-shaped frosting I wanted to test out fondant as the decoration. I recently purchased paisley shaped cutters from a famous baker in the UK by the name of Lindy Smith.
I'll be honest, fondant is a little tricky to get used to. I wore gloves because fondant sticks to your hands. The lady at Jane's Cakes and Chocolates said to use Crisco to make fondant easier to work with but I decided against it. I made sure that there was plenty of powdered sugar on my work surface and on my gloves. Fondant is kind of like play dough so it was fun to work with. I have gel frosting colors so I thought I would do red paisley cut outs with a smaller white paisley on top. I didn't like the way the red ones came out so I scraped that and made smaller pink paisley cut-outs.
Then I used a round frosting tip to cut out small white circles. In order to stick fondant pieces together you have to use a small paint brush dipped in water to adhere them.
I put six pink paisleys on each cupcake. They looked really nice although the whole process took me a super long time. My best friend, Jess, came over and had to help me finish the decorations. Thankfully, they were a hit at the open house.