
March 30, 2011
Gluten-Free Cupcakes
After my post about the gluten-free chocolate cake, I've had some questions about gluten-free cupcakes. The answer is yes, I can make them. They are called Poppy Seed Gluten-Free Cupcakes. These cupcakes have an apricot buttercream and are decorated with sliced almonds. Instead of wheat flour I will use potato starch flour. These cupcakes will be $3 a piece with a minimum order of 12.
 Photo courtesy of http://www.justasoap.co.uk/catalog/apricot-kernel-oil-p-196.html
March 26, 2011
Flourless Chocolate Cake
The idea of making flourless chocolate cake always interested me. I'm not sure why. About a year ago I found a recipe that I absolutely fell in love with and I learned that you don't have to be gluten intolerant to enjoy this wonderful confection.
Cracked Chocolate Earth (Flourless Chocolate Cake)
Courtesy of Tyler Florence
1 pound bittersweet chocolate, chopped into small pieces
1 stick unsalted butter
9 eggs, separated
3/4 cup granulated sugar
Preheat the oven to 350 degrees F. Butter a 9-inch springform pan.
Put the chocolate and butter into the top of a double boiler (or in a heatproof bowl) and heat over (but not touching) about 1 inch of simmering water until melted. Meanwhile, whisk the egg yolks with the sugar in a mixing bowl until light yellow in color. Whisk a little of the chocolate mixture into the egg yolk mixture to temper the eggs - this will keep the eggs from scrambling from the heat of the chocolate; then whisk in the rest of the chocolate mixture.
Beat the egg whites in a mixing bowl until stiff peaks form and fold into the chocolate mixture. Pour into the prepared pan (spray the bottom with nonstick spray) and bake until the cake is set, the top starts to crack, and a toothpick inserted into the cake comes out with moist crumbs clinging to it, 20 to 25 minutes. Let stand 10 minutes, then unmold.
This recipe is really simple. Just keep in mind that it's all about the eggs. If you mess that up then you're going to end up with chocolatey scrambled eggs. If you've never tempered eggs before then my advice is to go slowly. Don't add more than 1/3 cup of chocolate at a time. Once you've tempered eggs once or twice and have gained confidence then you can add a little more chocolate at a time. Just be careful.
The body of the cake comes from the egg whites. When I've made this cake for people they find it hard to believe it doesn't have any flour because it's so fluffy. Well friends, it's all in the wrist. Folding eggs can be a little tricky, but again it takes a little practice. Once you've beaten the eggs until they form stiff peaks, add about 1/3 to the chocolate. Using only a rubber spatula cut through the mixture and roll your wrist in a clockwise direction (if you are right-handed), folding the chocolate and egg whites together. Keep going and turn the bowl a quarter of a turn every time you fold. Fold only until the chocolate and egg whites are barely mixed and then add another third. Never, ever use a whisk to mix the chocolate and egg whites together and never use the spatula to mix rigorously. If you have trouble picturing what folding is, then be sure to check out some videos on YouTube. You could even go to the Food Network website and find a video there.
A quick note about the pan. You want to use a good spring-form pan that doesn't leak. I got mine from Wal-mart and it had a viking on it so I bought it and it's great. For this cake, instead of spraying it with anything (you should know by now that I don't like using the spray stuff) I grease the pan using butter and a paper towel. Once I spread a thin layer of butter all over, I use granulated sugar to coat the inside of the pan. To do this, just throw some sugar inside, shake it all about, and then discard any leftover sugar. Once the cake is baked you'll get a nice crunchy outside.
If you use a toothpick to check for doneness please be warned: the center of the cake should be a little raw. If you stick a toothpick in the center then the batter should stick to it. If you stick the toothpick about an inch to two inches away from the center, then you should have crumbs sticking to it. Once, I made the cake and made sure the toothpick came out clean but the cake ended up super dry. If you bake the cake to the point where it's still a little sticky in the middle then once it cools you will have a perfectly baked cake. If you're worried it's too raw then don't panic; once the cake is cooled down to room temperature you can throw it in the fridge and you'll have a cake that has the texture of cheesecake. How awesome is that?
I have one last note on this recipe. Due to the fact that it only has four ingredients make sure to get high quality products. Your eggs should be really fresh. The butter should be quality, un-salted, sweet cream. The chocolate is the most important thing. I always use Ghirardelli bittersweet chocolate. It's a little expensive but definately worth it. If you can't find chocolate that specifically says "bittersweet" then look for something that has a 65% or higher cocoa content.
This cake is definately worth the effort. It's rich without being heavy. The bittersweet chocolate allows you to enjoy the taste of chocolate without the sweetness. Even my dad, who is not normally a fan of chocolate, likes this cake. My serving suggestion is to make it as close to serving time as possible. It's wonderful when it's warm with a dollop of whipped cream on top or high quality vanilla ice cream on the side.
Don't be intimidated by the need for intermediate skills. You can do it. Just take your time until you gain confidence.
March 21, 2011
Scones
Scones are a food that will either taste like bits of heaven or they will taste like bricks made from saw dust. There's really no middle ground. I have had scones that were wonderful and some that were barely edible even with the generous addition of butter and lemon curd. Ina Garten from the Food Network has a recipe that creates perfectly light scones that have the right amount of sweetness.
Cranberry Orange Scones
courtesy of Ina Garten
4 cups plus 1/4 cup all-purpose flour
1/4 cup sugar, plus additional for sprinkling
2 tablespoons baking powder
2 teaspoons kosher salt
1 tablespoon grated orange zest
3/4 pound cold unsalted butter, diced
4 extra-large eggs, lightly beaten
1 cup cold heavy cream
1 cup dried cranberries
1 egg beaten with 2 tablespoons water or milk, for egg wash
1/2 cup confectioners' sugar, plus 2 tablespoons
4 teaspoons freshly squeezed orange juice
Directions
Preheat the oven to 400 degrees F.
In the bowl of an electric mixer fitted with a paddle attachment, mix 4 cups of flour, 1/4 cup sugar, the baking powder, salt and orange zest. Add the cold butter and mix at the lowest speed until the butter is the size of peas. Combine the eggs and heavy cream and, with the mixer on low speed, slowly pour into the flour and butter mixture. Mix until just blended. The dough will look lumpy! Combine the dried cranberries and 1/4 cup of flour, add to the dough, and mix on low speed until blended.
Dump the dough onto a well-floured surface and knead it into a ball. Flour your hands and a rolling pin and roll the dough 3/4-inch thick. You should see small bits of butter in the dough. Keep moving the dough on the floured board so it doesn't stick. Flour a 3-inch round plain or fluted cutter and cut circles of dough. Place the scones on a baking pan lined with parchment paper. Collect the scraps neatly, roll them out, and cut more circles.
Brush the tops of the scones with egg wash, sprinkle with sugar, and bake for 20 to 25 minutes, until the tops are browned and the insides are fully baked. The scones will be firm to the touch. Allow the scones to cool for 15 minutes and then whisk together the confectioners' sugar and orange juice, and drizzle over the scones.
I don't normally make cranberry orange scones. It's a nice combination but it's not my favorite. If you want to make scones the way Ina does then by all means go right ahead. If you want to make scones the way I make scones then follow my recipe.
In a large bowl, sift together
4 cups of AP flour
1/4 cup of sugar
2 tbs baking powder
2 tsp kosher salt
In a separate, medium bowl mix together:
3/4 pound (3 sticks) of slightly cold butter that has been cut into pea-sized cubes with a butter knife
4 extra large eggs
1 cup of half-and-half (you could even use whole milk)
I use a hand mixer to blend the wet ingredients until half of the butter no longer resembles cubes (start with the milk and eggs first, mix, and then add the cubed butter). Don't beat this mixture too long, it's not meant to be homogenous.
I add the wet ingredients into the bowl with the dry ingredients. With my hand mixer on low I lightly beat the two elements. I blend only until the liquid is incorporated into the flour. I stop using the hand mixer and then dig in with my hands. If you don't want to get messy then you won't get nice scones. No pain, no gain my friend.
Using my fingers I pinch the larger clumps of butter until they are more or less blended. You won't be able to blend the butter completely into the dough and that's ok. Just learn from my mistake: when I leave too many large clumps of cold butter in the dough, then all of that butter will melt out of the scones and create pools of clarified goodness at the bottom of the baking sheet and leave you with slightly dry scones.
The dough will get sticky really fast and become kind of gummy. This is good. Do your best to blend all the ingredients together. The dough is supposed to be lumpy. Then, using your fingers, pick up small amounts of dough and drop them onto a baking sheet lined with parchment paper. Making scones in this 'drop' method helps keep the air inside. If you knead the dough and add that extra flour I feel like you lose the light texture. Try not to compact the dough in your hands before putting it on the sheet (granted, this will be hard because the dough is so sticky and thick). Just scoop with your fingers and drop onto the sheet and be sure to leave atleast 1.5 inches between each scone. Easy-peasy. Put them into the oven at 400 degrees for 15 minutes and then check on them. I found that in my oven the tops of the scones look light but the bottoms get really brown, so be sure to lift up the scones at the 15 minute point. If they look tannish to a light brown give the scones a couple more minutes. Once the scones look brown in some parts but still maintain a light brown color in other parts then they are done. Again, you have to eye ball it. It's that easy.
This past Christmas I made a lot of scones. When my family is together we drink tea atleast twice a day and scones with tea go together like peanut butter and jelly. What flavor of scones was everyone's favorite? Crystallized ginger and dark chocolate. If you made a face while you read the previous sentence then you need to repent. It's a fabulous combination! Crystallized ginger can be found in most grocery stores and it is candied ginger that has been coated in sugar. I chop it until the pieces are small but not too small. The degree to which you chop your ginger is a personal preference. We love ginger in our family so I'm never afraid to keep some pieces medium-sized. As for the chocolate, it's best to use atleast semi-sweet. The reason I use dark chocolate is because the bitterness from the chocolate pairs beautifully with the sweetness from the ginger. Some people don't like dark chocolate, so if you don't prefer it then don't use it. When you bake it's important to follow the recipe but I think it's more important to use common sense and do what your taste buds like.
Here are some other variations you can try:
-instead of white sugar use brown sugar and maple syrup. Mix in finely chopped pecans with cinnamon and nutmeg.
-add 1 cup of pumpkin puree with some pumpkin spice. (Although I've never personally done this you may have to reduce the amount of milk you add)
-white chocolate with finely chopped macadamia nuts
-dried cherries with semi-sweet chocolate
-ground cardamom with finely chopped pistachios
-dried blueberries with lemon zest
-chopped, candied peel
-raisens
You can even make savory scones to compliment a brunch, light lunch or dinner. Remember to remove the sugar.
-finely chopped leeks that have been sauteed in oil, chedder cheese, fresh chives and chopped ham
-grated, smoked hard cheese and parsley
-replace 1/2 cup milk with 1/2 cup sour cream and add chives
-sauteed onion, bacon and grated cheddar cheese
-blue cheese, freshly chopped spinach, parsley and green onion
-cheddar cheese and mustard powder
-Romano cheese and finely chopped walnuts
Scones are no longer "that dry stuff" British people eat with their high tea. Scones are simple to make and a versatile palette for your palette.
 In January, I made four different types of scones for the ladies in my mother's Esther Fellowship group. They were greatly enjoyed by all.
Cranberry Orange Scones
courtesy of Ina Garten
4 cups plus 1/4 cup all-purpose flour
1/4 cup sugar, plus additional for sprinkling
2 tablespoons baking powder
2 teaspoons kosher salt
1 tablespoon grated orange zest
3/4 pound cold unsalted butter, diced
4 extra-large eggs, lightly beaten
1 cup cold heavy cream
1 cup dried cranberries
1 egg beaten with 2 tablespoons water or milk, for egg wash
1/2 cup confectioners' sugar, plus 2 tablespoons
4 teaspoons freshly squeezed orange juice
Directions
Preheat the oven to 400 degrees F.
In the bowl of an electric mixer fitted with a paddle attachment, mix 4 cups of flour, 1/4 cup sugar, the baking powder, salt and orange zest. Add the cold butter and mix at the lowest speed until the butter is the size of peas. Combine the eggs and heavy cream and, with the mixer on low speed, slowly pour into the flour and butter mixture. Mix until just blended. The dough will look lumpy! Combine the dried cranberries and 1/4 cup of flour, add to the dough, and mix on low speed until blended.
Dump the dough onto a well-floured surface and knead it into a ball. Flour your hands and a rolling pin and roll the dough 3/4-inch thick. You should see small bits of butter in the dough. Keep moving the dough on the floured board so it doesn't stick. Flour a 3-inch round plain or fluted cutter and cut circles of dough. Place the scones on a baking pan lined with parchment paper. Collect the scraps neatly, roll them out, and cut more circles.
Brush the tops of the scones with egg wash, sprinkle with sugar, and bake for 20 to 25 minutes, until the tops are browned and the insides are fully baked. The scones will be firm to the touch. Allow the scones to cool for 15 minutes and then whisk together the confectioners' sugar and orange juice, and drizzle over the scones.
I don't normally make cranberry orange scones. It's a nice combination but it's not my favorite. If you want to make scones the way Ina does then by all means go right ahead. If you want to make scones the way I make scones then follow my recipe.
In a large bowl, sift together
4 cups of AP flour
1/4 cup of sugar
2 tbs baking powder
2 tsp kosher salt
In a separate, medium bowl mix together:
3/4 pound (3 sticks) of slightly cold butter that has been cut into pea-sized cubes with a butter knife
4 extra large eggs
1 cup of half-and-half (you could even use whole milk)
I use a hand mixer to blend the wet ingredients until half of the butter no longer resembles cubes (start with the milk and eggs first, mix, and then add the cubed butter). Don't beat this mixture too long, it's not meant to be homogenous.
I add the wet ingredients into the bowl with the dry ingredients. With my hand mixer on low I lightly beat the two elements. I blend only until the liquid is incorporated into the flour. I stop using the hand mixer and then dig in with my hands. If you don't want to get messy then you won't get nice scones. No pain, no gain my friend.
Using my fingers I pinch the larger clumps of butter until they are more or less blended. You won't be able to blend the butter completely into the dough and that's ok. Just learn from my mistake: when I leave too many large clumps of cold butter in the dough, then all of that butter will melt out of the scones and create pools of clarified goodness at the bottom of the baking sheet and leave you with slightly dry scones.
The dough will get sticky really fast and become kind of gummy. This is good. Do your best to blend all the ingredients together. The dough is supposed to be lumpy. Then, using your fingers, pick up small amounts of dough and drop them onto a baking sheet lined with parchment paper. Making scones in this 'drop' method helps keep the air inside. If you knead the dough and add that extra flour I feel like you lose the light texture. Try not to compact the dough in your hands before putting it on the sheet (granted, this will be hard because the dough is so sticky and thick). Just scoop with your fingers and drop onto the sheet and be sure to leave atleast 1.5 inches between each scone. Easy-peasy. Put them into the oven at 400 degrees for 15 minutes and then check on them. I found that in my oven the tops of the scones look light but the bottoms get really brown, so be sure to lift up the scones at the 15 minute point. If they look tannish to a light brown give the scones a couple more minutes. Once the scones look brown in some parts but still maintain a light brown color in other parts then they are done. Again, you have to eye ball it. It's that easy.
This past Christmas I made a lot of scones. When my family is together we drink tea atleast twice a day and scones with tea go together like peanut butter and jelly. What flavor of scones was everyone's favorite? Crystallized ginger and dark chocolate. If you made a face while you read the previous sentence then you need to repent. It's a fabulous combination! Crystallized ginger can be found in most grocery stores and it is candied ginger that has been coated in sugar. I chop it until the pieces are small but not too small. The degree to which you chop your ginger is a personal preference. We love ginger in our family so I'm never afraid to keep some pieces medium-sized. As for the chocolate, it's best to use atleast semi-sweet. The reason I use dark chocolate is because the bitterness from the chocolate pairs beautifully with the sweetness from the ginger. Some people don't like dark chocolate, so if you don't prefer it then don't use it. When you bake it's important to follow the recipe but I think it's more important to use common sense and do what your taste buds like.
Here are some other variations you can try:
-instead of white sugar use brown sugar and maple syrup. Mix in finely chopped pecans with cinnamon and nutmeg.
-add 1 cup of pumpkin puree with some pumpkin spice. (Although I've never personally done this you may have to reduce the amount of milk you add)
-white chocolate with finely chopped macadamia nuts
-dried cherries with semi-sweet chocolate
-ground cardamom with finely chopped pistachios
-dried blueberries with lemon zest
-chopped, candied peel
-raisens
You can even make savory scones to compliment a brunch, light lunch or dinner. Remember to remove the sugar.
-finely chopped leeks that have been sauteed in oil, chedder cheese, fresh chives and chopped ham
-grated, smoked hard cheese and parsley
-replace 1/2 cup milk with 1/2 cup sour cream and add chives
-sauteed onion, bacon and grated cheddar cheese
-blue cheese, freshly chopped spinach, parsley and green onion
-cheddar cheese and mustard powder
-Romano cheese and finely chopped walnuts
Scones are no longer "that dry stuff" British people eat with their high tea. Scones are simple to make and a versatile palette for your palette.

My favorite Chocolate Chip Cookies
Before I got into cupcakes I loved making cookies and brownies (and I still do). I have to credit the start of my baking career to my brothers. They would go off to college and I would make goodies for them. My brownies were and continue to be from the box. Ghiradelli Triple Chocolate Brownies are hands-down the best brownies ever!! You can't go wrong, I promise. As far as cookies are concerned, my favorite recipe is from Giada De Laurentis from the Food Network. I started making this recipe many years ago and I love the results ever time.
Hazelnut Chocolate Chip Cookies
courtesy of Giada De Laurentis
1/2 cup old-fashioned oats
2 1/4 cups all-purpose flour
1 teaspoon baking powder
1 teaspoon baking soda
1/2 teaspoon salt
1 cup unsalted butter, room temperature
1 cup (packed) light brown sugar
1 cup sugar
2 large eggs
1 teaspoon pure vanilla extract
4 ounces English toffee candy (recommended: Heath or Skor bar), finely chopped
1 cup hazelnuts, toasted, husked, and chopped
1 (12-ounce) bag semisweet chocolate chips
Directions
Preheat the oven to 325 degrees F.
Line 2 heavy large baking sheets with parchment paper. Finely chop the oats in a food processor. Transfer the oats to a medium bowl. Mix in the flour, baking powder, baking soda, and salt. Set aside.
Using an electric mixer, beat the butter and sugars in a large bowl until fluffy. Beat in the eggs and vanilla. Add the flour mixture and stir just until blended. Stir in the toffee, hazelnuts, and chocolate chips.
For each cookie, drop 1 rounded tablespoonful of dough onto sheet, spacing 1-inch apart (do not flatten dough). Bake until the cookies are golden (cookies will flatten slightly), about 15 minutes. Cool the cookies on the baking sheets for 5 minutes. Transfer to a cooling rack and cool completely. (The cookies can be prepared 1 day ahead. Store airtight at room temperature.)
I've made my own changes to the recipe.
1. I don't put the oats through a food processer. I really like the texture of oats.
2. I add about 1/4-1/2 of a cup more of oats
3. I only put in 3/4 of a cup each of brown sugar and regular sugar
4. I never, ever melt my butter in the microwave. It changes the consistency of the creamed butter and sugar mixture.
5. I cream the butter and sugar until it is quite light in color
6. I always add more vanilla extract
7. I rarely use hazelnuts. I personally like using walnuts better because I think it tastes better plus, it's cheaper.
8. I don't put an entire bag of chocolate chips in the the batter, I usually eye-ball it. Most times I use about 3/4 of the bag.
9. Lastly, I don't line the baking sheets with parchment paper. I usually shmear butter on the baking sheets and wipe them down before I scoop more batter onto them. This is more messy and time-consuming but I like the way they turn out.
I hope you enjoy your delicious cookies!!
March 19, 2011
Adventures with Fondant
I wanted to make Red Velvet cupcakes for Jesse and Deidre Johnson's open house. Instead of doing my normal star-shaped frosting I wanted to test out fondant as the decoration. I recently purchased paisley shaped cutters from a famous baker in the UK by the name of Lindy Smith.

 I'll be honest, fondant is a little tricky to get used to. I wore gloves because fondant sticks to your hands. The lady at Jane's Cakes and Chocolates said to use Crisco to make fondant easier to work with but I decided against it. I made sure that there was plenty of powdered sugar on my work surface and on my gloves. Fondant is kind of like play dough so it was fun to work with. I have gel frosting colors so I thought I would do red paisley cut outs with a smaller white paisley on top. I didn't like the way the red ones came out so I scraped that and made smaller pink paisley cut-outs.
 Then I used a round frosting tip to cut out small white circles. In order to stick fondant pieces together you have to use a small paint brush dipped in water to adhere them.
 I put six pink paisleys on each cupcake. They looked really nice although the whole process took me a super long time. My best friend, Jess, came over and had to help me finish the decorations. Thankfully, they were a hit at the open house.
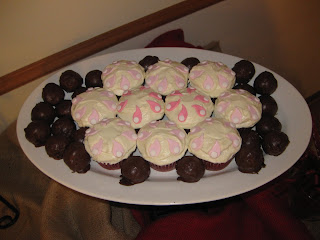


Cake Truffles
So I wanted to try out cake truffles or cake balls. I had left over frosting from making cupcakes for my nephew's birthday. I researched it online and found two ways of making them. The most common way is to use boxed cake mix and ready made frosting. Here's the recipe by Bakerella for Red Velvet cake balls:
Red Velvet Cake Balls
1 box red velvet cake mix (cook as directed on box for 13 X 9 cake)
1 can cream cheese frosting (16 oz.)
1 package chocolate bark (regular or white chocolate)
wax paper
1. After cake is cooked and cooled completely, crumble into large bowl.
2. Mix thoroughly with 1 can cream cheese frosting. (It may be easier to use fingers to mix together, but be warned it will get messy.)
3. Roll mixture into quarter size balls and lay on cookie sheet. (Should make 45-50. You can get even more if you use a mini ice cream scooper, but I like to hand roll them.)
4. Chill for several hours. (You can speed this up by putting in the freezer.)
5. Melt chocolate in microwave per directions on package.
6. Roll balls in chocolate and lay on wax paper until firm. (Use a spoon to dip and roll in chocolate and then tap off extra.)
I also only melt a few pieces of chocolate bark at a time because it starts to cool and thicken. It’s easier to work with when it’s hot.
 Another way is to use boxed cake mix with coffee creamer. So I set out to make them...let me tell you they take lots and lots of time. The cake part is easy. I used devil's food cake.
  I also use butter to grease my pans. I used to use the spray but my brother commented a few times about how he didn't like the taste. So for his sake I use butter. It's a little bit more messy but once you taste the results I think you'll find it's worth the extra effort. Plus, the less hydrogenated oils and processed soy products that go into your body, the better. I decided to make two boxes because I wanted to experiment. When using two racks in the oven it's important to remember one important fact: halfway through baking switch the top cake with the bottom. This will guarantee equal levels of doneness.
 Once the cakes were done I wanted to let them cool. Now I came across two techniques when it came to breaking the cakes apart. Bakerella said to let the cakes cool completely before breaking them apart but other blogs said to let the cakes cool down for about 10 minutes and then break them apart. What did I choose to do? I combined both ideas by letting the cakes cool and then taking a fork and breaking the cakes apart into medium size pieces.
 Once the cakes were cool I put on my handy latex-free gloves and went to town breaking the medium bits into crumbs. I took out any hard pieces and put them in a bowl for later. Next, came the frosting.
 There is something oddly therapeutic about squishing frosting and crumbs together whilst watching "How To Train Your Dragon". I didn't put the entire tub of frosting into the cake because most sites said not to. When mixing with my hands I made sure not to smoosh everything too much because I didn't want a paste. Once the mixture was nicely moist, I took out my cookie scooper and scooped out cake truffles and put them on waxed paper.
  Most sites say to roll the balls in your hands but I wanted to avoid this for two reasons. One, it would mean less work and two, at Yummy Cupcakes (my favorite cupcake bakery) I watched the pastry chef scoop out balls and I didn't think she rolled them. The cake truffles at Yummy Cupcakes are amazing, by the way. It took a while to scoop all the balls out but once I was done I produced exactly 70 perfectly shaped balls.
  Again, going back to the recipe, you're supposed to put the balls in the fridge for some time. Maybe skipping this step explains why I had trouble with the dipping. I began dipping the freshly scooped balls into the chocolate bark using a fork in one hand and a spoon in the other. The first 5 or 6 came out well but after that the crumbs began accumulating in the chocolate and my truffles were looking awfully lumpy. So after doing about a dozen I cleaned out the lumpy chocolate bark and replaced it with fresh squares and began rolling the balls in my hands. Some of my balls rolled out nicely but some were breaking apart. I guess I could have used more frosting. I did my best to push the balls together and placed them back into the baking sheets. Then I restarted the dipping process. Although the process went a bit better it was getting late so I decided to close shop for the night and begin again the next afternoon.
The next day I decided to use semi-sweet chocolate chips in one double boiler and Reese's chips in another.
 The Reese's chips were super thick when they were melted so I added some semi-sweet chips to loosen up the mixture. Another issue was that the melted chips took much longer to harden. The chocolate bark hardened within 20 minutes.
All in all these are my observations:
1. Chocolate bark makes the truffles taste like Dunkin' Donuts chocolate donut holes.
2. Taste-wise the Reese's covered truffles were the best, followed by the semi-sweet and lastly the chocolate bark.
3. I wish I had put more frosting in the crumbs in order to keep the balls together.
4. Cake truffles done 3-4 days ahead of the time you want to eat them taste the best
 I took some balls to Bible study and they were a hit.
Two of my friends, Sarah and Hannah, were the first to try them.

Sarah nearly passed out because she liked them so much :)

Cake truffles do take quite a bit of time to make but they are a definate crowd-pleaser. If this is something you would like to bring to a party but don't want to go through the effort of making them you can always order them from me. They only cost $0.50 a piece with a minimum order of 2 dozen.
Red Velvet Cake Balls
1 box red velvet cake mix (cook as directed on box for 13 X 9 cake)
1 can cream cheese frosting (16 oz.)
1 package chocolate bark (regular or white chocolate)
wax paper
1. After cake is cooked and cooled completely, crumble into large bowl.
2. Mix thoroughly with 1 can cream cheese frosting. (It may be easier to use fingers to mix together, but be warned it will get messy.)
3. Roll mixture into quarter size balls and lay on cookie sheet. (Should make 45-50. You can get even more if you use a mini ice cream scooper, but I like to hand roll them.)
4. Chill for several hours. (You can speed this up by putting in the freezer.)
5. Melt chocolate in microwave per directions on package.
6. Roll balls in chocolate and lay on wax paper until firm. (Use a spoon to dip and roll in chocolate and then tap off extra.)
I also only melt a few pieces of chocolate bark at a time because it starts to cool and thicken. It’s easier to work with when it’s hot.


The next day I decided to use semi-sweet chocolate chips in one double boiler and Reese's chips in another.

All in all these are my observations:
1. Chocolate bark makes the truffles taste like Dunkin' Donuts chocolate donut holes.
2. Taste-wise the Reese's covered truffles were the best, followed by the semi-sweet and lastly the chocolate bark.
3. I wish I had put more frosting in the crumbs in order to keep the balls together.
4. Cake truffles done 3-4 days ahead of the time you want to eat them taste the best

Two of my friends, Sarah and Hannah, were the first to try them.

Sarah nearly passed out because she liked them so much :)

Cake truffles do take quite a bit of time to make but they are a definate crowd-pleaser. If this is something you would like to bring to a party but don't want to go through the effort of making them you can always order them from me. They only cost $0.50 a piece with a minimum order of 2 dozen.
March 12, 2011
Failure is not Final
I just found out through a letter from WesternU that I was not accepted for admission for the fall. Although in my heart of hearts I knew that I wasn't going to get in, it was hard to not feel disappointed. Reality set in that I had yet another year to spend in limbo. To be honest this was not a part of my plan. My plan consisted of four years of college, one year off, and then grad school. Unfortunately, one year turned into two and now two is going to become three. At times it feels my life is on hold and I can't get on with living until I get into grad school. Needless to say, my plan or my ideas for my life are not what God has in store for me.
I think as Christians we grow accustomed to use a certain vernacular. It's easy to tell someone, "Trust in the Lord," or "God is sovereign." These phrases might be used as a shield to prevent us from getting too involved in someone's life or they might be spoken from a genuine heart. We use these phrases so often that we become calloused to their true meaning and the depth of the truth behind them. When you're in the midst of the unknown and you feel the darkness of uncertainty enveloping you, it's necessary to be reminded of God's sovereignty and truth. It's good to hear someone else remind you that God's truth is final and failure is not. My dad reminded me that failure is not final and it's our failures that shape us into who God wants us to be. Romans 8:28 says that "...we know that for those who love God all things work together for good for those who are called according to His purpose." This is a wonderful promise but let's not overlook the next verse which says, "For those whom He foreknew He also predestined to be conformed to the image of His Son." It's easy for me to get caught up in my goals and expectations for my life that I forget the true purpose of my life. I exist to glorify God in what I do. I am on a journey to be conformed into the image of the One who saved me. Lastly, I am to share the Good News with others.
Our treasures are not stored in this world but the next. What we go through here on Earth is only for a short season compared to what awaits us. In Romans 8:18 Paul says, "For I consider that the sufferings of the present time are not worth comparing with the glory that is to be revealed to us." My dad also reminded me of Job 2:10 when Job told his wife "Shall we receive good from God and shall we not receive evil?" Job made a valid point. The Lord is abundant in His blessings and grace and we are more than happy to receive them without question. Should we not also welcome sorrow and grief with open arms? We should and we must. Job sums up how our attitude should be in Job 1:21, "...Naked I came from my mother's womb, and naked shall I return. The Lord gave, and the Lord has taken away; blessed be the name of the Lord." Nothing we have in this world is ours. Our intelligence, our strength, our abilities, and our accomplishments don't belong to us, they belong to God so He can do with them what He wishes.
Even though I'm still a little disappointed that I didn't get accepted, I'm excited to see what the Lord will do in my life this year. I anticipate doors opening and closing, new relationships being forged and old relationships being strengthened. My prayer is that I learn how to be a better servant and that my desire to serve greatly outweighs my desire to be served.
My cupcake business gives me hope for new opportunities and a new way to minister to others.
March 9, 2011
My First Order!
By the grace of God, I received my first order today. I decided to make Red Velvet because they always come out really well. Here are some pictures:


Thanks to my brother Kevien, for making the labels. They add such a great touch to the packaging. The Kaitlyn's Kupcakes logo is his brain child. It's so perfect!


Thanks to my brother Kevien, for making the labels. They add such a great touch to the packaging. The Kaitlyn's Kupcakes logo is his brain child. It's so perfect!
March 7, 2011
Ordering Cupcakes
As far as ordering cupcakes goes, it's pretty simple. I need atleast 3-4 days advance notice for a small order (1-2 dozen) and atleast a 1 week notice for any order larger than 3 dozen.
When it comes to flavor I can do anything you like. My favorite flavor that I've made so far is called Gajar Halwa. It's an Indian take on carrot cake. The cupcake itself is flavored with carrot, cardamom and cashew and the frosting is made of homemade cashew butter and cream cheese. Another one of my favorites is Pistachio which is flavored with homemade pistachio paste. I also do a standard Chocolate and a fancier version which is Chocolate with Chocolate Mousse inside. Pumpkin cupcakes with cream cheese frosting is one of my absolute favorites (granted, I love anything with pumpkin). Red Velvet is a flavor that is a part of my repertoire. I'll throw in Vanilla just for good measure. If there are any flavors you enjoy then please drop me a comment or email me your suggestion. All cupcakes and frostings are made from scratch from the freshest ingredients.
Standard cupcakes are $24 per dozen. Any cupcakes that require nuts are $30 per dozen. The minimum order is one dozen.
I'm in the North Hollywood area so I can deliver cupcakes if you're in the valley or in Santa Clarita. In regards to mailing cupcakes this has been my experience:

I tried mailing cupcakes to my brother in Florida and that was the outcome. So until I figure out a better way to ship cupcakes I'm going to stay away from shipping.
I've had great success making cupcakes and delivering them for events. My most recent event was my nephew's first birthday.


Thankfully the cupcakes came out really well. I found the decorations at a cake supply store called Jane's Cakes in Montrose. There are so many options when it comes to cake decorations. There are fancy cupcake liners, sprinkles, frosting colors and the options expand when fondant comes into the mix.
March 6, 2011
Welcome!
Thank you for visiting my blog. I'm so excited to begin this new adventure in my life. What is this new adventure, you ask? Well, I'm starting a small cupcake business out of my home. It's been a long process full of brain storming and trials but I finally feel that I'm ready to go public. My goal is simple: to make people happy and be an encouragement.
I want to be able to allow people to place orders and to bake fresh cupcakes for them. Not only do I enjoy making cupcakes but I also love baking breads, cookies, cakes and various other sweet treats. If there's anything you want to eat then please let me know. Anything is possible.
I'm also beginning to dabble in experimentation when it comes to baking. The internet has opened the door of possibilities and there are thousands of recipes out there to fulfill any need you have. Take, for example, the idea of cake truffles or cake bon-bons. There are two distinct ways of making them either using frosting or coffee creamer. Both ways seem to work, but the question is which is better? That's where I come in. I'm going to experiment on different recipe ideas and report back to my blog with my results.
Not only will I post the results of my experiments but I will also keep you posted about any events or projects that I take on. My biggest event that's coming up is my brother's wedding. I'm really excited because not only is my big bro getting married but I'll be providing cupcakes for the rehearsal dinner and the wedding reception. Not only does this endeavor take on baking but there's also a lot of research involved. I love doing research (it's true, I'm a bit of a nerd). Trying to find the right recipe for the right occasion is so exciting and satifying. The hunt never ends it only continues.
Please drop me an email to tell me what you think at kaitlynskupcakes@gmail.com or post a comment below. I look forward to hearing from you!
Subscribe to:
Posts (Atom)